
Mikrotik Port Forwarding

Imagine a world where your internet connection is lightning-fast, your online games never lag, and your video calls are crystal clear. Well, that’s the kind of magic that MikroTik brings into your home or office network!
MikroTik isn’t just any ordinary router – it’s like the superhero of networking. It’s designed to make sure all your devices, from your laptop to your smart fridge, stay connected seamlessly. No more frustrating buffering when streaming movies, no more dropped connections during important video conferences – MikroTik has got your back.
With MikroTik, you’re not just getting a router; you’re getting a whole suite of tools to customize and control your network. Whether you want to prioritize bandwidth for your gaming console or set up a secure guest network for your friends, MikroTik lets you do it all. It’s like having a personal network engineer without the hefty price tag.
And the best part? MikroTik’s technology is so user-friendly that even if you’re not a tech genius, you can still set it up and make it work like a charm. Say goodbye to those days of struggling with complicated router settings – MikroTik’s interface is designed with you in mind.
So, if you’re tired of slow connections, dropped signals, and confusing router setups, it’s time to embrace the MikroTik revolution. Transform your online experience into something truly extraordinary – faster, smoother, and more reliable than ever before. Your devices deserve the best, and MikroTik delivers exactly that.
What is Mikro Tik?
MikroTik RouterOS is a powerful Linux-independent operating system designed to interact with MikroTik network equipment. MikroTik RouterOS is more than a simple router operating system and has many functions and applications. This software is capable of turning it into dedicated routers by running on a normal and personal computer.
Port Forwarding or Port Mapping is a NAT program used in MikroTik to redirect traffic from an IP address and port number on a remote network to an IP address and port number on a local network. In other words, Port Forwarding is the most secure way to connect to your servers from outside your local network without risking network security.
MikroTik is a hardware and network equipment manufacturer in Latvia that is the main provider of Internet access infrastructure (hardware and software) in most countries. They design and market hardware and software for computer networks, including routers, switches, access points, utility software, and operating systems.
RouterOS is the operating system used by MikroTik. MikroTik provides a lot of freedom to manage networks with its advanced router. Installing RouterOS on a PC turns the device into a fully functional router with features such as routing, firewall, bandwidth control, wireless access point, backhaul link, hotspot gateway, VPN server, and more. In order to provide automatic operation, the boot time can be reduced by using Mikrotik, a very effective router.
What is Port Forwarding?
Port forwarding means redirecting internet traffic from one port to another. It is a networking technique that allows incoming internet traffic to reach a specific device or service on your local network. It’s commonly used to enable remote access to devices or applications behind a router. By configuring port forwarding settings, you can direct incoming traffic from a specific port to a designated device or service within your local network. This can be useful for applications like online gaming, remote desktop access, or hosting a web server. Keep in mind that improper port forwarding configurations can pose security risks, so it’s important to understand the process and the potential risks involved.
A MikroTik router or any other device running RouterOS makes this process easier. Therefore, assigning a specific port to a specific service in the private network makes it possible to use that specific service for another user by entering that port in their browser or software.
Mikrotik is placed as a router between the internal path of your private network and the public network (Internet). For example, suppose you have a site inside the organization with a specific port. In that case, if you are thinking of outsourcing your IP address or domain with a port to the software inside the organization, you should use port forwarding.
Imagine that you are the IT manager of an extensive network looking for a safe, low-risk method for network security to allow someone to remotely access your VPS on your network while you don’t want to share the server’s IP with that remote person. In this situation, port forwarding in the Mikrotik router is the safest solution to solve your problem, which provides the possibility of connecting to the VPS in the local network for people outside your private network through the port. For this, you need to buy the desired Mikrotik VPS first so that you can benefit from Mikrotik Port forwarding.
Network Diagram
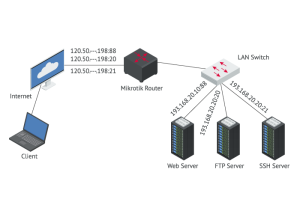
The ether1 interface of the MikroTik router in this network is connected to a wide area network (WAN) with IP address120.50.–.198, while the ether2 interface is connected to a LAN switch with IP address193.168.20. Only those on the local area network (LAN) can access the three servers (web server, FTP server, and SSH server) located on the internal network. By using MikroTik Port Forwarding, you can make these servers available to users outside your local network; we will teach how to configure MikroTik Port Forwarding to connect to servers inside the local network through the Internet for users outside the local network.
How to configure Mikrotik Port Forwarding?
Mikrotik Port forwarding is a widely used method to respond to various purposes, which are considered three common purposes in our training:
- Port Forwarding to Internal Web Server
- Port Forwarding to Internal FTP Server
- Port Forwarding to Internal SSH Server
Configuring MikroTik port forwarding to the internal Web server through Winbox
To go through the port forwarding steps, note that you have installed the latest version of MikroTik RouterOS.
To provide access to a web server inside the internal network from outside the internal network, we provided the following steps to configure MikroTik Port Forwarding to connect from the public network to a specific web server with Ip Address (193.168.20.10) according to the network diagram as an example.
Step 1: Log in to the Mikrotik server using Winbox as a server administrator with the required permissions
Step 2: Click on IP on the left side of the panel
Step 3: In the opened menu, select Firewall.
Step 4: In the Firewall window, click on the NAT tab.
Step 5: The NAT Rule window will appear by clicking on the PLUS (+) sign.
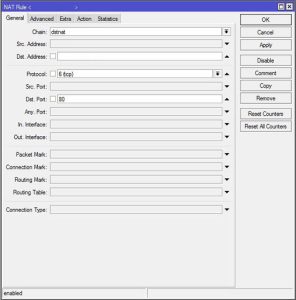
Step 6: By clicking on the General tab, the Chain drop-down menu will open; select the dstnat option from the list you see.
Step 7: Type the MikroTik WAN IP Address(120.50.–.198) in the Dst. Address input field. (Enter the IP Address from which you intend to forward all requests.)
Step 8: Click on the TCP connection protocol from the Protocol drop-down menu.
Step 9: In the Dst Port field, enter the port from which you decide to forward requests. Usually, the number 80 is entered in the Dst Port field because web servers run on TCP port 80.
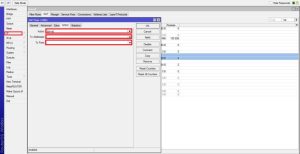
Step 10: Now go to the Action tab.
Step 11: Select the dst-nat option from the Action drop-down list.
Step 12: In the To Addresses input field, enter the desired web server IP to which you want requests to be forwarded.
Step 13: Enter the port to which all requests are forwarded in the To Ports field. (You can type the number 80 in the To Ports field.)
Step 14: To confirm and save the information we entered, click Apply and then Ok.
Finally, the port forwarding configuration to the internal web server has been completed successfully. Now you can access the web server by sharing the MikroTik WAN IP in web browsers outside your local network. If you want to add new rules to port forwarding, you can add new ports or IPs by going through the steps we explained.
Configuring Mikrotik port Forwarding to the Internal FTP server through Winbox
FTP(file transfer protocol) server is used to share files through client and server programs. You can also use port forwarding to create Nat rules allowing Internet users to access your FTP server. This configuration method is for the situation the FTP server is set in our local network, and we intend to provide access to the FTP server from the public network through the Mikrotik port forwarding configuration.
For this purpose, follow the steps we will explain to reach your goal.
Step 1: Log in to the Mikrotik router via Winbox as a server administrator.
Step 2: In the left part of the panel, by clicking on IP, select Firewall in the IP menu list.
Step 3: In the Firewall window, open the NAT tab.
Step 4: Create a New NAT Rule by clicking the PLUS (+) sign.
Step 5: Click on the General option, and from the chain drop-down menu, click on dstnat.
Step 6: In the input field Dst. Address, Enter MikroTik WAN IP(120.50.–.198).
Step 7: To send the protocol packets, you need to continue configuration by selecting the Protocol option and selecting TCP from Protocol drop-down list.
Step 8: In the Dst Port field, you must enter the port to which they will be connected from the public network. You can specify a port according to the server type and forward it, but FTP Server usually works on TCP port 21, so put the number 21 in this field.
Step 9: Select the Action tab and set it to the dst-nat option.
Step 10: In the To Addresses field, enter the IP of the FTP server inside the network (193.168.20.20.20).
Step 11: Fill the To port field with the port of the internal server to which we want to transfer requests and traffic. (You can enter the number 21 in this field)
Note: The input and output ports can be the same or different.
Step 12: To confirm the new rules, select apply and then OK.
The process of configuring port forwarding to your internal network’s FTP server has been completed. Now you can connect to the internal network FTP server from the Internet by entering ftp://mikrotik-wan-ip (ftp:// 120.50.–.198) in FTP clients or any web browser.
Note: Don’t forget to allow FTP service or TCP port 21 in your FTP server firewall to connect to the FTP server from the public network.
Configuring Mikrotik port Forwarding to Internal SSH server through Winbox
This is how to configure Mikrotik port forwarding to connect to the SSH server in the internal network through the public network. To do this, follow the steps below:
Step 1: Log in to the Mikrotik server through Winbox with administrative privileges
Step 2: By referring to the IP option on the left side of the panel, select Firewall from the IP menu.
Step 3: Click the NAT tab in the Firewall window.
Step 4: Open the New NAT Rule window by clicking the PLUS sign (+).
Step 5: By selecting the General tab, select the dstnat option in the Chain drop-down menu.
Step 6: Enter the MikroTik WAN IP address in our network diagram (120.50.–.198) in the Dst address section.
Step 7: By selecting the protocol option to send packets from the Protocol list, click on the TCP option.
Step 8: Fill the Dst Port input field with the port from which you intend to transfer requests. Usually, TCP port 22 is chosen to run the SSH server, so enter the number 22 in the Dst Port field.
Step 9: Now go to the Action tab and select the dst-nat option from the Action list.
Step 10: In the To Addresses field, enter the SSH Server IP (193.168.20.20.21).
Step 11: Complete the To Ports field with port 22.
Step 12: Finally, press the Apply and Ok buttons to confirm.
Finally, you were able to configure Mikrotik port Forwarding to the Internal SSH server successfully, and if you followed the steps correctly, you can now connect to your internal SSH server through any SSH client (Putty or SSH Secure Shell Client) from the Internet.
Note: For communicating with the SSH server from the public network, it is necessary to allow the SSH service or TCP port 22 in the firewall of the SSH server.
Must Read; How to Reinstall Ubuntu Linux
For More Updates follow us on Facebook, Twitter, Instagram.