
Hibernate Mode on Windows 11.

Windows 11 has brought about a remarkable transformation in terms of its overall design and user experience, exuding an air of opulence and sophistication.
However, amidst these changes, one can find solace in the fact that many settings and features concealed within the Control Panel have remained unchanged.
Take, for instance, the hibernate mode, which continues to function just as it did in its predecessor, Windows 10.
Hibernate mode, akin to its slumbering counterpart, sleep mode, serves as a power-saving feature that conserves precious battery life. Yet, it surpasses sleep mode by preserving your system’s state within a file on your esteemed hard drive or SSD.
Although it may be slightly slower than sleep mode, as it diligently stores the system state onto your esteemed system drive rather than RAM, it undeniably serves as an exceptional means to prolong the battery life of your esteemed Windows 11 device, particularly for the esteemed realm of laptops. Regrettably, it is disheartening to note that this invaluable feature is not enabled by default on the majority of Windows 11 systems.
However, fear not, for with a few simple steps, you can unlock the potential of hibernate mode and bask in the glory of extended battery life, ensuring that your esteemed Windows 11 experience remains unparalleled in its grandeur.
Hibernate vs sleep mode on Windows 11
Nowadays, there is a wide range of laptops available that boast impressive battery life. However, if you find yourself frequently using your laptop without access to a charger, battery endurance can still be a cause for concern.
Thankfully, Windows 11 offers power management features that can assist in this regard, although it is important to understand how they function in order to utilize them effectively. One option is to put your laptop or desktop PC into sleep mode. This feature saves the current system state, including any open documents and running applications, to the RAM.
By entering a low-power state, your computer conserves energy while allowing you to quickly resume your work when you return. It is worth noting, however, that sleep mode still consumes a small amount of battery life. If your battery drains completely while in this mode, there is a risk of losing any unsaved work.
Alternatively, you can opt for hibernate mode. This mode saves your current system state to a hard drive or SSD before shutting down your system.
The key distinction between a normal shutdown and hibernate mode is that the latter preserves your system’s state. Unlike sleep mode, hibernate mode does not consume any power.
When you power on your PC again, you will find your apps and open documents exactly as you left them. Nevertheless, it is important to consider that waking up from hibernate mode takes longer compared to sleep mode.
This is because the system needs to reload the saved state from a slower hard drive or SSD, rather than the faster RAM.
How to enable hibernate mode in Windows 11 using Control Panel
The fastest way to enable hibernate mode in Windows 11 is by using the power options menu in the Control Panel.
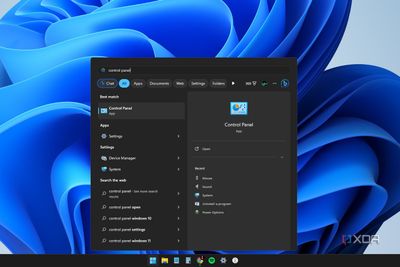
- Launch the Start menu and search for Control Panel.
- From the Control Panel menu, click Hardware and Sound.
- Under Power Options, click Change what the power buttons do.
4. You’ll see the Hibernate option at the bottom, but it’s likely grayed out. Click Change settings that are currently unavailable to interact with the grayed-out settings.
5. Tick the box next to the Hibernate setting, and click Save changes.
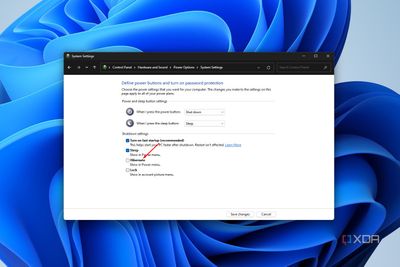
That’s all there is to it. The next time you click on the power menu in Windows 11, you’ll see the Hibernate option right above the Shut Down option. To disable Hibernate mode, follow the same steps above and just uncheck the Hibernate setting when you get to the Power Options menu.
How to activate hibernate mode in Windows 11 using Command Prompt
If you can’t see the hibernate option in the Power Options menu, the hibernation file is likely missing from Windows 11. This could happen for several reasons: Windows could delete the file if you’re running low on disk space, and certain system cleaning tools might accidentally remove it. System errors or file corruption can also lead to the hibernation file’s disappearance.
Whatever the case may be, you can quickly recreate the hibernation file in Windows 11 using the Command Prompt. Follow the steps below to do so:
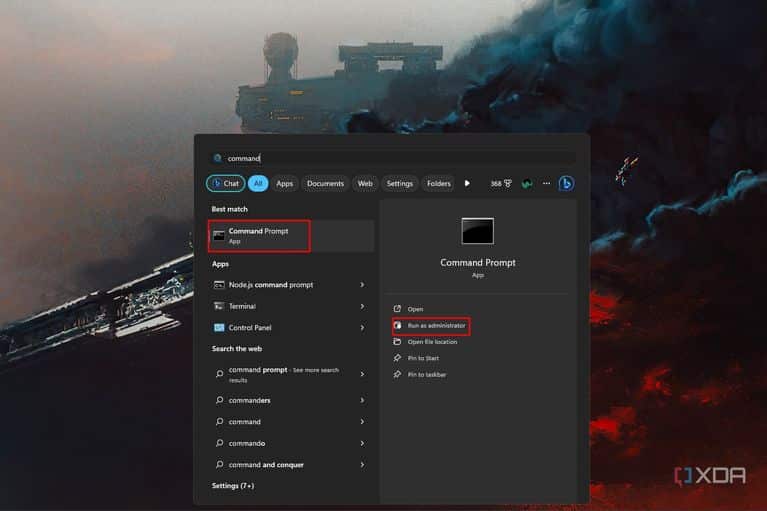
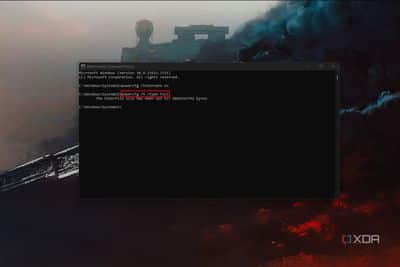
- Search for the Command Prompt app in the Start menu, and click Run as administrator.
2. Type this command into the terminal and Enter on your keyboard to switch on hibernation mode:
powercfg /hibernate on
3. After entering the command above, you need to set the type of hibernation as well. We want to create a standard hibernation mode file, so type this command into the terminal and hit Enter on your keyboard:
powercfg /h /type full
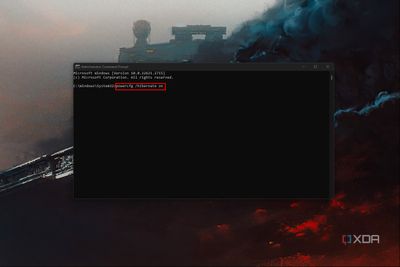
The first command is used to enable hibernation mode and create the hibernation file, while the second one configures the type and size. Now, just click the power menu icon in the Start Menu, and you’ll find the Hibernate option right above the Shutdown option.
If you want to disable hibernation mode, you can delete the hibernation file by entering this command into the Command Prompt terminal:
powercfg-h off
How to activate Hibernate mode in Windows 11 using Registry Editor
Another way of enabling hibernate mode is by tweaking the registry settings. This might be a bit advanced if you’re unfamiliar with the registry editor, but as long as you follow the steps properly, you’ll be fine.
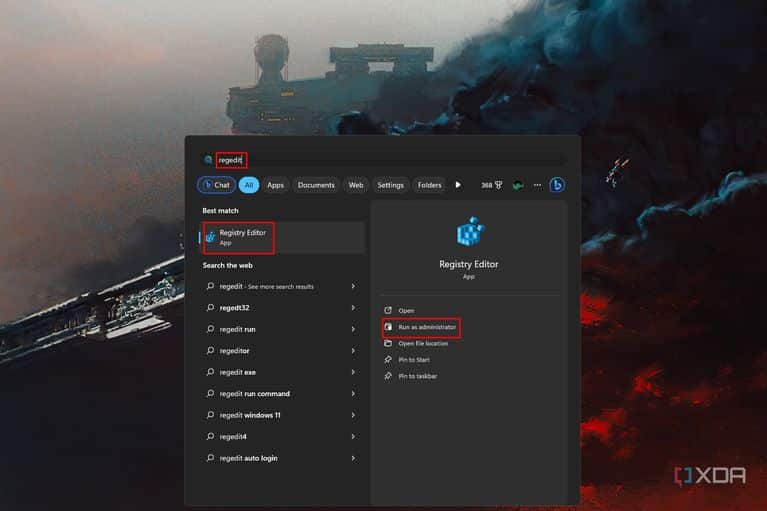
- In the Windows 11 Start Menu, type Regedit into the search bar and select the Run as administrator.
2. When the Registry Editor launches, you’ll see an address bar in the top area that says Computer. Copy and paste this path into the address bar:
Computer\HKEY_LOCAL_MACHINE\SYSTEM\CurrentControlSet\Control\Power
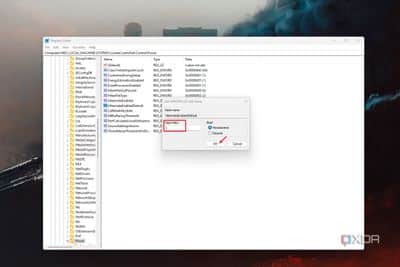
3. In the right-hand area, look for the HibernateEableDefault option in the list of settings.
4. Double-click the HibernateEableDefault option to open an edit window.
5. Under the Value Data field, type 1 and click OK.
This simple registry edit will enable the Hibernation feature on your Windows 11 system. If you ever want to disable hibernation or reverse this edit, follow the steps above again and set the Value Data to 0.
Maximize Your Windows 11 Experience
By mastering the art of hibernation mode, you unlock the full potential of extended battery life and seamless productivity. Whether you’re a tech enthusiast, a professional, or a casual user, maintaining an optimal Windows 11 experience is all about smart power management and leveraging advanced features.
To elevate your digital experience even further, consider the robust hosting and server solutions from AMAZINGRDP. With a range of services designed to meet diverse needs, including:
- VPS Hosting: Experience fast, scalable, and secure virtual private servers for all your hosting needs.
- Dedicated Servers: Get unparalleled control and performance with powerful dedicated servers.
- RDP Services: Boost productivity with high-speed remote desktop solutions.
Whether you’re managing a personal project or running an enterprise application, AMAZINGRDP ensures reliability, speed, and exceptional service. Embrace the synergy of an optimized Windows 11 environment and world-class hosting solutions—because your tech experience deserves nothing but the best.
Explore More , Unlocking Hyper-V on Windows 11 and Windows Server 2022: A Step-by-Step Guide
Stay Connected with us on Meta , X, Instagram .
READ OUR BLOGS .