
Launching Linux from USB on a Windows Computer

How to boot Linux from USB (Method 1: Preparing Windows)
To ensure a smooth Linux boot from a USB drive on your modern Windows PC, there are a few security-related steps you should take. If you’re using Windows 11 Pro, it’s important to disable the BitLocker encryption (if enabled) to prevent any potential disk errors when switching back to Windows after booting from USB. Additionally, disabling fast startup will grant you access to your BIOS settings. Lastly, disabling secure boot is necessary to enable booting from an external USB drive, as certain Linux distributions may not be compatible with the standard. Rest assured, these adjustments will not compromise your PC’s security against viruses or any other threats. So, let’s proceed confidently and enjoy the benefits of Linux on your Windows PC!
Disable Fast Startup
- Open the Start Menu and search for Control Panel.
- Click the top result.
- Switch the Control Panel to the Category view from the top under View by

- Choose Hardware and Sound.

Select Power Options.

6. Click on Choose what the power buttons do.

7.Uncheck the box at the bottom for Turn on fast startup (recommended)
Disable BitLocker
- Open the Windows 11 Start Menu.
- Search for BitLocker.
- Click the top result for Manage BitLocker.

4. In the window, click the Turn off BitLocker.

5. Agree to the prompts on the screen.
Disable Secure Boot
- Boot into Windows 11 like you normally would.
- Log out of your account and get to the lock screen.
- Press the power button, and hold the Shift key, then select Restart.
- On the recovery screen, go to Troubleshoot > Advanced Options: UEFI Firmware Settings.
- Navigate to the Authentication, Boot, or Security tab in your BIOS.
- Look for a Secure Boot option and set it to Disabled.
- If there’s an option for it, under Authentication Boot, or Security, select the option for Enable Boot from USB devices.
How to boot Linux from USB ( Method 2: Downloading the ISO for your Linux flavor)
In the next segment, we move on to the second part of the process. Now, it’s time to acquire the ISO file for your chosen Linux flavor. Additionally, we’ll guide you through the creation of a bootable installer using Rufus. Remember, you’ll require a USB drive with a capacity larger than 4GB for this installation. It’s recommended to use a 16GB USB drive for a smoother experience.
- Download an ISO file for your favorite Linux flavor that you want to use. In our example, we use Ubuntu, which can be found here.
- Once the file is downloaded, install the latest version of Rufus. You can find it online. The latest version is 4.3.
- Once Rufus is downloaded, launch the app. Insert your empty USB drive where you want to boot Linux from into your PC.
- Select your drive under Device.
- Click the Select button and open the ISO file you downloaded earlier.

6. Leave the Partition scheme as MBR, and Target System as BIOS or UEFI.
7. Leave all other Format Options as Default.
8. Click Start.
9. If you get a pop-up, choose Write in ISO image mode.

10. Depending on your Linux flavor, you might have another pop-up, choose Yes to download GRUB 2.06.

11. Click OK to begin the process of installing Linux to that USB drive. 12. When done, Rufus will prompt you to close.
How to boot Linux from USB (Method 3: Booting from the USB drive)
Discover the ultimate convenience of booting Linux from the USB drive you have just created with Rufus. It’s a straightforward process, as long as you carefully follow the steps we have outlined to prepare and configure your PC for USB booting.
- Insert the USB drive you created into your computer.
- Some PCs might show a prompt to Select Boot Device or boot from a USB drive. If you see this prompt, press the corresponding key (Escape in our case) to be booted straight into the Linux install on your USB drive. This will just be a temporary boot each time you start your PC. If you want to boot Linux from USB permanently, skip to the next step.

3. While your PC is booting, press the key to boot into the BIOS loading screen. On most PCs, it can be Escape, F1, F2, F8, F10, F11, F12, or Delete. Check with your PC maker to see which key to press. For our example, it’s F2.
4. If you’re unsure, get into the BIOS through Windows. Open the Settings app, choose System> Recovery > Advanced Startup > Restart Now. Then, click Troubleshoot > Advanced options > UEFI Firmware settings.

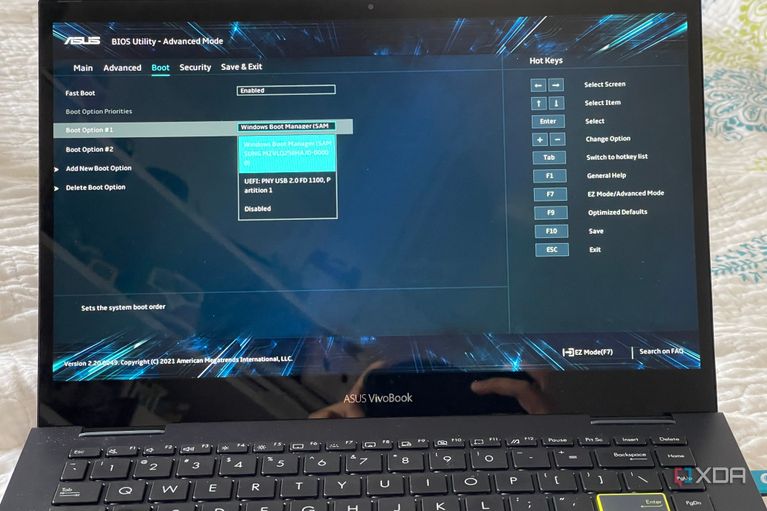
5. Once in the BIOS, under the Boot menu, drag, or move your USB drive up to be the first boot option. This will make your PC boot from the USB drive right away, skipping the BIOS in the future.
6. Reboot your PC and you should see that your system will boot right to your USB drive. Just click the Try or Install option on your screen.
For those looking to elevate their digital journey, AMAZINGRDP offers an exceptional range of services tailored to your needs. From high-performance VPS hosting and dedicated servers to reliable RDP solutions, AMAZINGRDP ensures you have the robust infrastructure needed for seamless performance. Embrace the freedom of Linux and pair it with the power of AMAZINGRDP’s services to unlock new potential and achieve your goals with confidence.
Explore More, How to install XAMPP on Ubuntu Linux Server
Stay Connected on Meta , X,Instagram .
READ OUR BLOGS.